Download
Use Existing Public And Private Keys
If you have an existing OpenSSH public and private key, copy the id_rsa key to your Windows desktop. This can be done by copying and pasting the contents of the file or using an SCP client such as PSCP which is supplied with the PuTTY install or FileZilla.
Next launch PuTTYgen from the Windows Programs list.
- Click
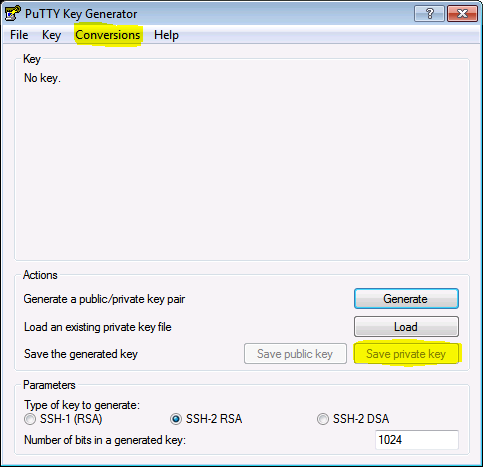
Conversionsfrom the PuTTY Key Generator menu and selectImport key. - Navigate to the OpenSSH private key and click
Open. - Under
Actions/Save the generated key, selectSave private key. - Choose an optional passphrase to protect the private key.
- Save the private key to the desktop as
id_rsa.ppk.

If the public key is already appended to the authorized_keys file on the remote SSH server, then proceed to Connect to Server with Private Key.
Otherwise, proceed to Copy Public Key to Server.
Create New Public And Private Keys
Launch PuTTYgen from the Windows Programs list and proceed with the following steps.
- Under
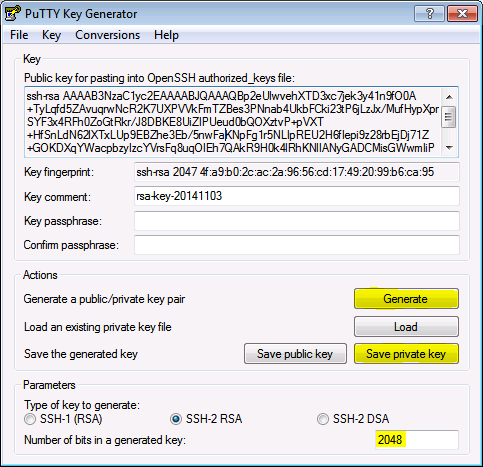
Parameters, increase theNumber of bits in a generated key:to a minimum value of 2048. - Under
Actions/Generate a public/private key pair, clickGenerate. - You will be instructed to move the mouse cursor around within the PuTTY Key Generator window as a randomizer to generate the private key.
- Once the key information appears, click
Save private keyunderActions/Save the generated key. - Save the private key to the desktop as
id_rsa.ppk. - The box under
Key/Public key for pasting into OpenSSH authorized_keys file:contains the public key.

Copy Public Key To Server
The OpenSSH public key is located in the box under Key / Public key for pasting info OpenSSH authorized_keys file:. The public key begins with ssh-rsa followed by a string of characters.
- Highlight entire public key within the PuTTY Key Generator and copy the text.
- Launch PuTTY and log into the remote server with your existing user credentials.
- Use your preferred text editor to create and/or open the
authorized_keysfile:vi ~/.ssh/authorized_keys - Paste the public key into the
authorized_keysfile.ssh-rsa AAAAB3NzaC1yc2EAAAABJQAAAQBp2eUlwvehXTD3xc7jek3y41n9fO0A TyLqfd5ZAvuqrwNcR2K7UXPVVkFmTZBes3PNnab4UkbFCki23tP6jLzJx/MufHypXprSYF3x4RFh0ZoGtRkr/J8DBKE8UiZIPUeud0bQOXztvP pVXT HfSnLdN62lXTxLUp9EBZhe3Eb/5nwFaKNpFg1r5NLIpREU2H6fIepi9z28rbEjDj71Z GOKDXqYWacpbzyIzcYVrsFq8uqOIEh7QAkR9H0k4lRhKNlIANyGADCMisGWwmIiPJUIRtWkrQjUOvQgrQjtPcofuxKaWaF5NqwKCc5FDVzsysaL5IM9/gij8837QN7z rsa-key-20141103 - Save the file and close the text editor.
- Adjust the permissions of the
authorized_keysfile so that the file does not allow group writable permissions.chmod 600 ~/.ssh/authorized_keys - Logout of the remote server.
一定要复制出来
登录服务器的时候,明明用puttyGen已经生成公钥和私钥了,但无论怎么改设置总是登陆不了。之前成功过,这次失败点在于puttyGen里面有一个保存公钥的按钮,点了以后保存的公钥,不能直接命名authorized_keys直接用在服务器上,因为里面多了几行其他内容。比如
---- BEGIN SSH2 PUBLIC KEY ---- Comment: "rsa-key-20200516"
这些内容大概服务器端是不认的,所以一直认证失败。而解决办法是直接复制生成的公钥内容,在编辑器里打开并粘贴后,命名为authorized_keys。还有一个需要注意的问题是,为了图省事使用root操作文件的时候,如果没注意,把authorizedkeys导入~/.ssh/以后,实际上是把文件导入到了/root/.ssh/,所以,路径应该正确输入为/home/xxxx/.ssh/,这样才能把publick_key正确输入
Connect To Server With Private Key
Now it is time to test SSH key authentication. The PuTTYgen tool can be closed and PuTTY launched again.
- Enter the remote server Host Name or IP address under
Session. - Navigate to
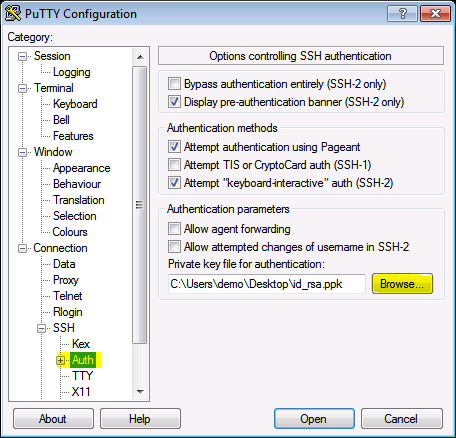
Connection>SSH>Auth. - Click
Browse...underAuthentication parameters/Private key file for authentication. - Locate the
id_rsa.ppkprivate key and clickOpen. - Finally, click
Openagain to log into the remote server with key pair authentication.
